
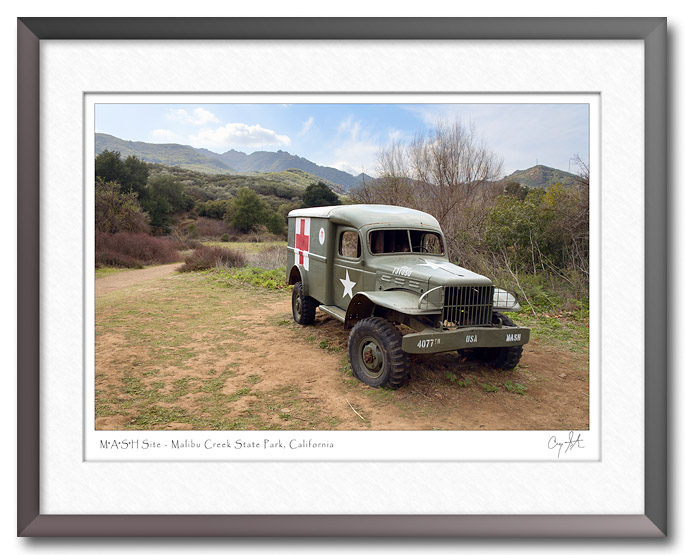
Remember the TV show MASH? The show followed the antics of a group of surgeons from the 4077th Mobile Army Surgical Hospital in Korea in the 1950’s. Of course, it wasn’t filmed in Korea, it was filmed in sunny Southern California at 20th Century Fox’s Century Ranch. Today, the movie ranch is the Malibu Creek State Park, but the MASH filming site is one of the highlights. It a fairly easy 2.5 mile hike through some beautiful scenery to get to the site, and it’s well worth the effort.
The scene pictured above presents the sort of challenge you frequently encounter. The sky is very bright compared to the foreground, and a camera can’t properly expose both the bright sky and the darker foreground all at once. One solution is to use a graduated neutral density filter, but in this case, I didn’t have one with me. When we’re hiking, I normally just carry a small camera and no accessories.
Another common approach is to take two exposures and blend them using Photoshop. Ideally you should lock the camera onto a tripod, set the lens to manual focus and the exposure mode to Aperture Priority and then carefully control the exposure compensation or turn on automatic exposure bracketing. But, for a simple scene like this, I’ve found I can take some shortcuts and still get good results.
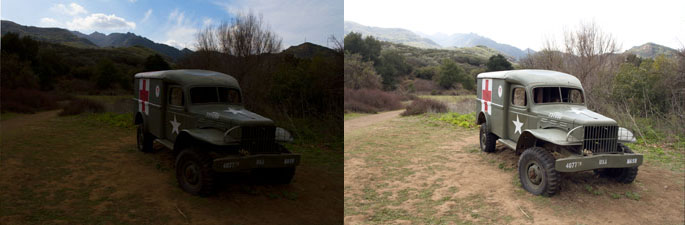
Most modern cameras use a half-press of the shutter button to lock the exposure, and the exposure calculation is based on what’s in the frame at the time. That allows you to frame a scene, half-press the shutter to set the exposure and then recompose the frame. In this case, I frame the scene to include mostly sky and half-press the shutter so that the camera calculates the exposure for the sky. Then, I recompose to get the scene I want in the frame and take the first frame (the dark one). Then I fully release the shutter button and take a second frame without moving the camera. The exposure for the second image is then calculated mostly for the foreground and that results in the lighter frame.
Then, it’s pretty straightforward to open the two images as layers in Photoshop, use the auto-align function to make sure they’re aligned and then use a layer mask to blend the two together. You do need to be careful that the sky doesn’t end up too dark. In this case, I ended up lightening the sky exposure frame a little bit to give a natural appearance. You still want bright regions to appear bright and dark areas to be dark for the photo to look right..
For more details about the process in Photoshop, check out my new Photoshop video tutorial.